Setup Tutorial
The software will run on any off the shelf PC. Macintosh users will need to run PC emulation software. You must have administrator's rights to install it. There are two files which you will download and install. The first one installs all the system support files needed to run the program. The second one will be the latest version of the application. The software should be installed on your local machine. Although it can be installed on a network server, it is not recommended. Each user needs his or her own application directory. If more than one person is using the same program at the same time problems will occur. The software does support data sharing and you can have more than one station accessing the data at the same time as long as each has his or her own working directory.
If you see a message that says 'requires elevation' follow the steps at this page and then restart your computer.
Once the installation process starts you will see a blue screen that will walk you through the steps. If you see any error messages or warning along the way simply click ignore and continue.
After the installation is completed, download and install the latest update with this link. The file is labeled as 'alternate location' which is what we recommend for all new installations, especial Windows 7 or 8.
After the update is installed, look for the application in the folder at c:\hls\Honor Level System
The file you are looking for is the one with the shortest name. You will see it as either HLS or HLS.exe. Right click on the file and select 'Send to Desktop' as a short cut.
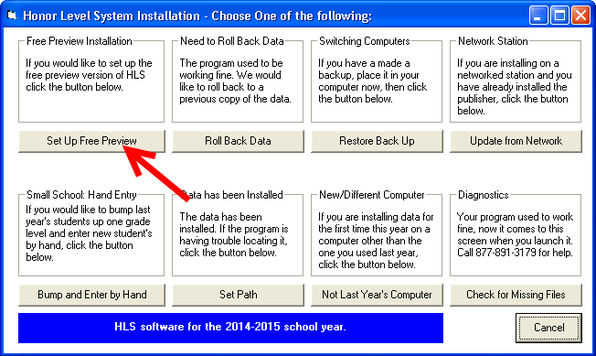
Begin by clicking the 'Set Up Free Preview' button.
 When you first launch HLS, the SetUp Wizard screen will appear to walk you through the steps to get the program up and running. You can use the Next and Back buttons to configure the program for your classroom. The Wizard will insist that you enter a few items before launching the program. Others can be filled in later, if you wish.

The first data that the Wizard wants to know is your name and the name of your school. A unique activation code will be generated and entered for you. Make sure you enter your school name and your name correctly. If you have to change them later, the activation code will be incorrect. Click the Next button.
 HLS uses short codes to identify teachers and staff. The Wizard will automatically create a code from your name. You may change it. If you want, you may add codes for other staff members or add them later when you are running the program.
Click Next when you are ready to proceed.
 Now tell the wizard which grade levels your students are in. Check all of the appropriate boxes and then click the Next button.
 The Wizard will display a list of suggested infractions. You can edit them here if you wish, or change them later using the Site Editor in the HLS program. Do not change items 0 or 9. HLS uses them to manage your data when students are either absent or fail to report for one of your consequences.
The number of demerits will determine the student’s Honor Level. The Wizard’s examples are a good guideline for setting demerits. Please note that this window helps you set up the lesser everyday problems that you might deal with. Big Ticket items are dealt with elsewhere and are well covered.
 Any infraction weighted at less than 3 demerits will be held against the student and used to calculate Honor Level for only 7 calendar days. Items that are 3 or more demerits will count for 14 days. This will make more sense as you progress through the Wizard.
Note: Your software includes a Site Editor that will allow you to change these infractions later, if you are not sure what you want right now.
The Wizard will show you an example of some progressive consequences that could be used in your discipline plan. You may have up to 7 steps.
The first step will always be used by infractions that are weighted at less than 3 demerits. It should be a relatively minor consequence. It could simply be: Warning, Watch Your Honor Level if you want to include warnings in the student record.
The highest consequence should leave you some flexibility to meet the needs of students who are chronic discipline problems.
 The final thing the Wizard wants to do is let you know that a Verification Code has been programmed, which will help prevent the unauthorized or accidental deletion of important data. It will simply be the digits123 unless you choose to change it here or edit it later in your Site Editor. The software will ask you for this code if, for example, you choose to delete a Student’s Record.
 There! The Wizard is now ready to prepare your data files and give you access to the program.
If you are happy with your entries, click the Finish button and your files will be written. These data files will be stored on your computer in a folder at: c:\hls\hls02.
Do not change the names of either of these folders. If you do your program will not function.
2. Launching the HLS Software
Now you’re ready to launch the HLS software.
Look in your Start Menu for the program. It will be named the Honor Level System. You can launch the software from here. If you want to make a shortcut for your desktop, you will find the application in Program Files\Honor Level System\HLS.

Finally, click OK and then restart your program.